

Best Angles for Shooting the Tiramisu Cake (Without Melting) Key Takeaways
If your tiramisu is plated with a clean slice showing five or six distinct layers, this is the angle to use.
- Best Angles for Shooting the Tiramisu Cake (Without Melting) start with a low 45-degree angle that shows both the top dusting and the fork-ready layers.
- Keep your setup cool — use LED panels instead of hot tungsten lights, and work in short bursts.
- Pre-chill your plates and props to buy yourself 10–15 extra minutes of shooting time.
What Makes Tiramisu So Tricky to Photograph?
Tiramisu isn’t like a sturdy chocolate cake or a crunchy cookie. It’s a no-bake dessert built on delicate layers of ladyfingers, espresso, mascarpone cream, and a blanket of cocoa powder. The moment you bring it under a hot studio light or leave it at room temperature too long, the cream softens, the cocoa absorbs moisture, and the beautiful cross-section turns into a sad pudding. That’s why finding the best angles for shooting the tiramisu cake (without melting) isn’t just a nice-to-have — it’s a survival skill for any food photographer. For a related guide, see How Long Can You Stay at Kooky Plate KL? Smart Avoid Rush Tips.
7 Best Angles for Shooting the Tiramisu Cake Without Melting
I’ve tested these angles with both raw tiramisu slices and fully assembled cakes. Each one works best under specific lighting conditions and helps you avoid the dreaded melt. Let’s go through them one by one.
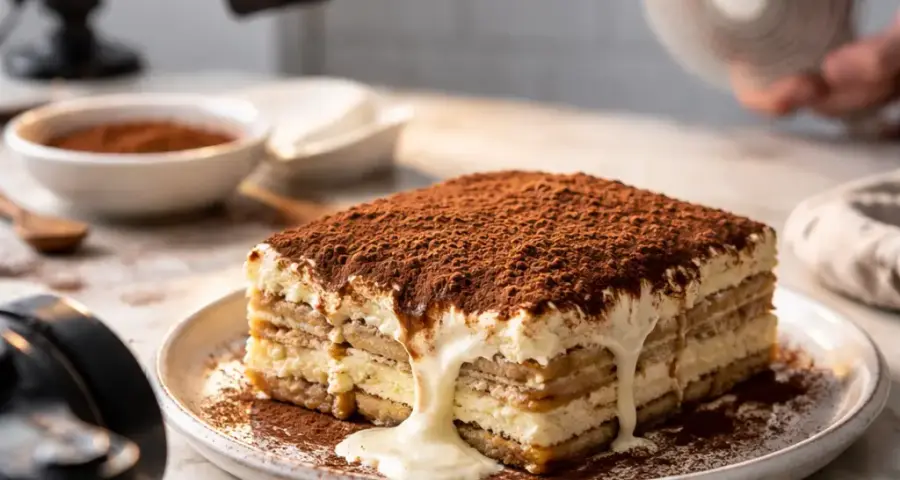
1. The Classic 45-Degree Angle (Top-Down Reach)
This is my go-to angle for tiramisu. Position your camera at about 45 degrees above the cake, pointing slightly downward. You catch the cocoa-dusted surface, a hint of the side layers, and a spoon or fork entering from the edge. It’s the most forgiving angle because the heat from the camera body and lights hits the surface at an angle, not straight down.
Pro tip: Use a shallow depth of field (f/2.8 or f/4) to blur the background while keeping the fork and first bite in focus. The layers stay visible, and the cream looks luscious — not melted.
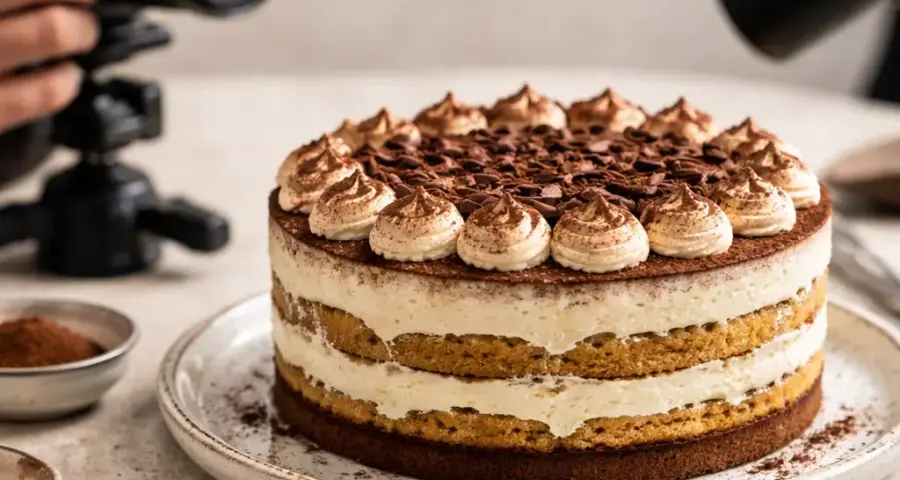
2. Straight-On Side View (For Perfect Layers)
If your tiramisu is plated with a clean slice showing five or six distinct layers, this is the angle to use. Camera at eye level with the cake, parallel to the table. The heat from the lights hits the wide side of the cream, so keep your session short and use a fan to circulate cool air.
Pro tip: Use a white or light gray background to reflect any stray heat away from the cake. The side view makes the layers pop, and you get to show off that beautiful espresso-soaked ladyfinger line.
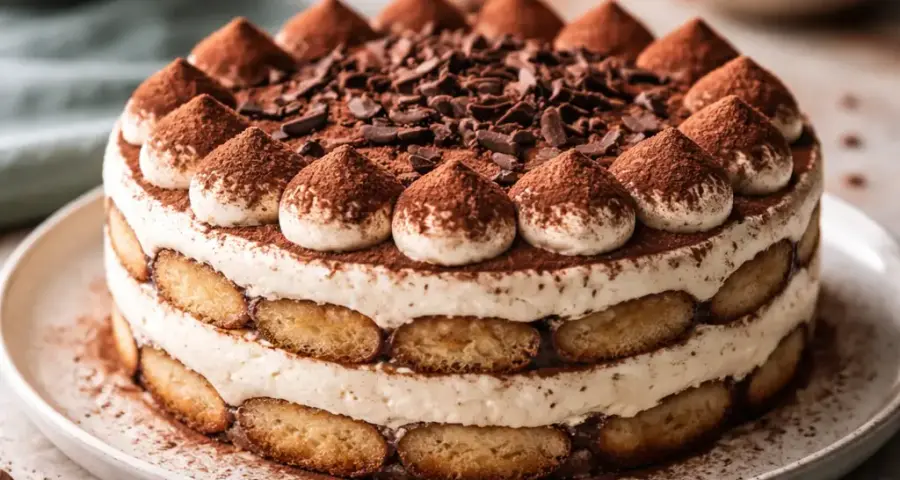
3. Overhead Flat Lay (For Cocoa Art)
When the top of your tiramisu is dusted with a pattern — think stenciled cocoa hearts or a dusting of chocolate shavings — the 90-degree overhead angle is perfect. Place the cake on a cool marble slab or chilled wooden board. The overhead view keeps the heat source (your camera and lights) above and to the side, so the top stays crisp for longer.
Pro tip: Shoot fast — within 5 minutes of plating. Any longer and the cocoa will start to look tacky instead of powdery.
4. Low Angle With Fork Entering (Drama Shot)
For a dramatic, editorial look, place your camera low — just a few inches above the table — and angle it slightly upward. Have a fork piercing the side of the tiramisu as if someone is about to take the first bite. This angle hides any early melting on the bottom edge and focuses attention on the creamy interior.
Pro tip: Chill the metal fork for 5 minutes in the fridge before using. It will cool the cream on contact and keep the cut clean.
5. The Spoon-Dip Angle (For Soft Serve Tiramisu)
If you’re shooting a deconstructed or spoon-served tiramisu (think tiramisu in a glass or parfait cup), aim for about 30 degrees above the rim. You want to see the spoon entering the creamy top, with the glass sides showing the ladyfinger and cream layers below. This angle works great with cold LED lights because the glass reflects less heat than a plate.
Pro tip: Use a frosted glass or chilled metal cup — it keeps the cream cold and adds a gorgeous condensation effect for texture.
6. Macro Close-Up (For Texture Details)
A macro lens (or a zoom to 100mm+) gives you the chance to capture the tiny details: the tiny bubbles in the mascarpone, the flecks of espresso in the ladyfingers, the dusting of cocoa powder. This angle is ideal for a series of detail shots to accompany your hero image. The tight crop means you rarely need hot lights — a small LED panel from the side is enough.
Pro tip: Use a diffuser (even a white napkin works) to soften the light and avoid harsh shadows that can make cream look curdled.
7. The “Bite” Angle (Candid Action Shot)
For lifestyle imagery, capture the spoon or fork mid-air after scooping a small bite. The camera is at a 45-degree angle, focused on the spoon with the tiramisu slightly out of focus in the background. This angle suggests freshness and movement, and because the tiramisu isn’t in direct light for long, melting is rarely an issue.
Pro tip: Use a spoon that’s been chilled for 3 minutes. Scoop a small portion, bring it up, and shoot immediately. The colder spoon keeps the cream firm during the shot.
How to Keep Tiramisu Cool During a Shoot
Even the best angles for shooting the tiramisu cake (without melting) won’t save you if your studio is 85°F. Here are the three things I always do to keep the cake looking fresh: For a related guide, see 7 Easy Group Photo Tips Without Disturbing Other Diners.
- Pre-chill everything: The plate, the fork, the background board, and even the camera’s battery (if you’re comfortable with it). Leave them in the fridge for 10 minutes before the shoot.
- Use LED lights, not tungsten. Tungsten bulbs get hot fast. LED panels stay cool and give you consistent color temperature.
- Work in 10-minute windows: Take the tiramisu out of the fridge, shoot for 10 minutes, then slide it back into the fridge for 5 minutes. Repeat as needed.
Common Tiramisu Photography Mistakes (And How to Fix Them)
Here are the three mistakes I see food bloggers make with tiramisu shots — and exactly how to avoid them using the best angles for shooting the tiramisu cake (without melting).
Mistake 1: Using a Hot Key Light
If your key light is too hot, the cream will soften and slide before you get the shot. Instead, use a reflector to bounce natural window light onto the side of the tiramisu. It’s cooler and softer.
Mistake 2: Shooting Too Slow
Many photographers take time adjusting props, checking focus, and recomposing. Tiramisu doesn’t wait. I recommend setting up your composition with a dummy plate (a bowl of yogurt or a slice of dense cake), then swapping in the real tiramisu at the last second and shooting within 2 minutes.
Mistake 3: Ignoring the Cocoa Sweat
Even if the cream holds up, cocoa powder absorbs moisture from the air and from the cream beneath. The result: a patchy, greyish top. To prevent this, dust the cocoa powder just before the first shot, not 20 minutes earlier.
Useful Resources
For deeper dives into food photography lighting and gear, check out these two trusted resources:
- Food Photography Blog: Lighting for Dessert Photography — Practical guides on using natural and artificial light for delicate desserts.
- Digital Photography Review: Best LED Panels for Food Photography — My top recommendation for cool, consistent studio lights.
Final Thoughts on Tiramisu Cake Photography
Mastering the best angles for shooting the tiramisu cake (without melting) comes down to two things: planning your angle before the cake touches the plate, and keeping everything as cold as possible. Try the 45-degree angle first for a classic beauty shot, then experiment with the side view for layers or the overhead flat lay for patterns. Your tiramisu deserves a portrait that looks as good as it tastes — and with these tips, it finally will.
Frequently Asked Questions About Best Angles for Shooting the Tiramisu Cake (Without Melting)
What is the best angle for shooting tiramisu cake?
The 45-degree angle, slightly above the cake surface, is the best overall angle because it shows the top cocoa dusting and the side layers without melting the cream too fast.
How do I keep tiramisu from melting during a photo shoot?
Pre-chill your plates and props, use LED lights instead of hot tungsten bulbs, and work in 10-minute windows with fridge breaks in between.
Should I use a flash for tiramisu photography?
Avoid direct flash. It heats the cream and creates harsh shadows. Use a softbox or diffused natural light for a gentle, cool illumination.
Can I shoot tiramisu under natural window light?
Yes, natural light is ideal. Position the cake near a north-facing window for soft, indirect light that stays cool throughout the shoot.
How long can tiramisu sit out before melting in photos?
If the room is around 70°F (21°C), tiramisu stays firm for about 10–15 minutes. In a warm studio, you have about 5 minutes before the cream starts softening.
What props work best for tiramisu photography?
Use chilled metal or porcelain spoons, dark wooden boards for contrast, and white marble slabs to reflect light and keep the cake cool.
How do you photograph the layers in tiramisu?
Use a straight-on side angle with the camera at eye level. Cut a clean slice with a chilled knife, then shoot quickly to capture the distinct layers.
What aperture is best for tiramisu cake photos?
For a sharp cake with a blurred background, use f/2.8 to f/4. For a full cake shot where everything is in focus, try f/8 to f/11.
How do you stop cocoa powder from looking wet in photos?
Dust the cocoa powder immediately before the first shot, and use a fine-mesh sieve instead of a spoon for an even, dry layer.
Is it better to photograph a whole tiramisu cake or a slice?
A slice is better for showing layers and texture. A whole cake works for overhead flat lays and lifestyle shots where the top decoration is the focus.
What is the best background color for tiramisu photography?
Light gray, off-white, or soft warm beige enhances the brown and cream tones. Avoid pure white (washes out the cocoa) or dark black (hides the cream details).
Do I need a macro lens for tiramisu details?
Not necessarily. A standard 50mm or 85mm lens with extension tubes can capture beautiful close-ups of the mascarpone texture and cocoa dusting.
How do you photograph tiramisu in a glass or cup?
Use a 30-degree angle above the rim, and place the glass on a chilled metal tray. The condensation on the glass adds visual interest and suggests freshness.
Can I use a reflector to help with tiramisu photos?
Absolutely. A white foam board placed opposite the main light source bounces soft light onto the side of the cake without adding heat.
What is the worst angle for tiramisu photography?
A straight overhead shot with a hot light directly above. It makes the cocoa look shiny, the cream looks flat, and melting occurs faster.
How do you make tiramisu look fresh in photos?
Shoot within 2 minutes of plating, use chilled props, and keep your lights at least 2 feet away from the cake. A light misting of water on the ladyfingers (if visible) adds a fresh look.
Should I chill the camera lens for tiramisu shots?
No, but make sure your camera body is at room temperature. A cold camera can cause condensation on the lens when you bring it close to the cake.
What’s the best way to cut tiramisu for a clean slice?
Use a sharp, serrated knife dipped in hot water and wiped dry. Cut slowly and then clean the knife between cuts for a perfect cross-section.
How do you add texture to tiramisu photos?
Add a sprinkle of chocolate shavings, a coffee bean, or a dusting of cinnamon next to the cake. The contrast in textures draws the eye to the creamy main subject.
Can I shoot tiramisu at night without melting it?
Yes, use a single LED panel at 30 degrees from the side. Keep the room air-conditioned (68–70°F) and your shooting sessions under 10 minutes.